
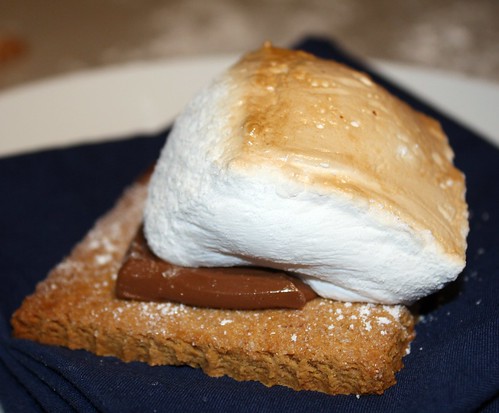
A couple of weeks ago I read in a magazine that August 10 is "National S'mores Day". That little bit of trivia was all I needed to reignite my craving for these campfire delights. Fortunately, thanks to my trusty toaster oven, no campfire is required.

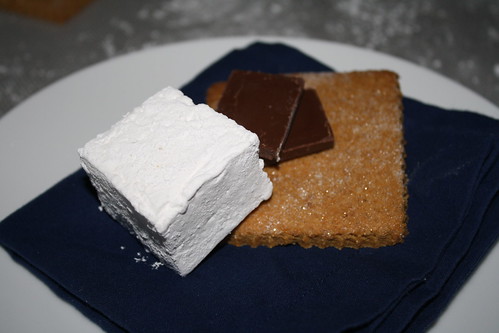
To make these s'mores extra special, I made my own marshmallows and graham crackers using a recipe in my new favorite cook book: Jam It, Pickle It, Cure It and Other Cooking Projects by Karen Solomon. (I'm not going to include the graham cracker recipe here, but let me know if you want it.) The marshmallows take the most time, about 2 hours from start to finish, and you will need a candy thermometer. There is a lot of "down" time involved, though, as you wait for the syrup to boil on the stove and later when the stand mixer miraculously turns the gelatin and syrup into bright white marshmallow fluff. These down times provided the perfect opportunity to work on the grahams, which take about an hour from start to finish.
Homemade s'mores make for a fun (and sticky!) afternoon cooking project. The grahams have such a comforting, homey quality -- just make sure not to make them too thick -- and the marshmallows are so soft and fluffy that you'll never want those dry tubes from a bag again!
Happy National S'mores Day -- why not celebrate by making your own?

Marshmallows
Adapted from Jam It, Pickle It, Cure It! by Karen Solomon
You'll need:
2/3 cup water, divided
3 (1/4 ounce) envelopes unflavored gelatin
1 cup granulated sugar
1 cup light corn syrup
pinch of kosher salt
1 tsp vanilla extract
1 cup confectioner's sugar, for dusting
(a stand mixer and candy thermometer are also necessary)
Directions:
Lightly oil the inside of an 8 by 8 inch pan with vegetable oil.
Generously coat with confectioners' sugar; set aside
Generously coat with confectioners' sugar; set aside
Pour 1/3 cup of the water into the bowl of a stand mixer. Sprinkle the gelatin over the water, and let it stand and soften while you proceed.
In a saucepan, off heat, combine the remaining 1/3 cup water and the granulated sugar, corn syrup, and salt. Place the pan over medium-high heat. Clip a candy thermometer to the inside of the pan and make sure it doesn't touch the bottom. Cook the mixture without stirring until it reaches 240 degrees Fahrenheit. (This may take a while, so this is a good time to start working on the graham crackers while you wait. Make sure to keep an eye on the thermometer, though!) Brush down the sides of the pan with a pastry brush, dipped in water, to wipe away any sugar crystals that form.
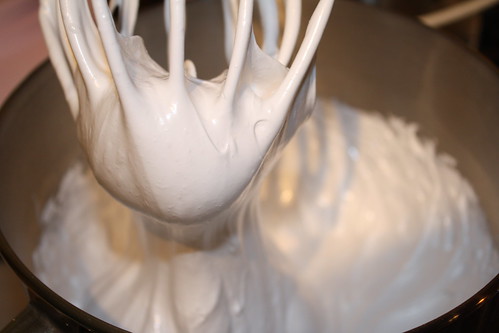
As soon as the syrup reaches 240 degrees, very carefully pour the hot syrup into the softened gelatin, while the mixer is on low speed. Add the vanilla, then increase the speed to medium-high. Beat the mixture for 8-13 minutes so that it becomes very white, stiff and sticky.
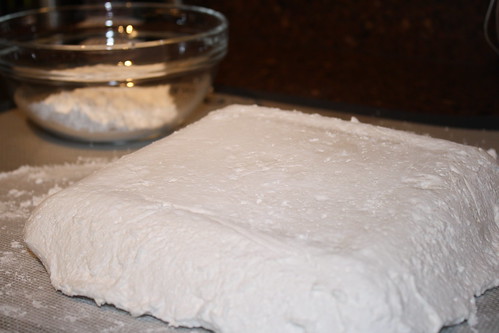
Spread the mixture into the prepared pan using a lightly oiled spatula. (I sprayed the spatula with cooking spray and kept it handy for when I needed to reapply.) The recipe suggests using your wet hands to press the marshmallow mixture against the corners of the pan, but I found that the oiled spatula worked fine. Allow the marshmallow to set. This should take about an hour. (While you wait, you can finish the graham crackers.)
When the marshmallow mixture has set, sift the confectioners' sugar into a shallow dish or bowl. Run a wet knife (or oiled spatula) around the edge of the cooled pan to loosen the marshmallow sheet. Remove the marshmallows from the pan -- this may take a little coaxing, but the sheet should be pretty sturdy once it's set, so don't worry. Cut into squares, using a sharp knife. It helps to wet the knife often to keep it from sticking. Toss each marshmallow in the confectioners' sugar until completely coated.
Store the marshmallows in a single layer (or between sheets of waxed paper) in an airtight container. It should last for up to 1 month.
As soon as the syrup reaches 240 degrees, very carefully pour the hot syrup into the softened gelatin, while the mixer is on low speed. Add the vanilla, then increase the speed to medium-high. Beat the mixture for 8-13 minutes so that it becomes very white, stiff and sticky.
Spread the mixture into the prepared pan using a lightly oiled spatula. (I sprayed the spatula with cooking spray and kept it handy for when I needed to reapply.) The recipe suggests using your wet hands to press the marshmallow mixture against the corners of the pan, but I found that the oiled spatula worked fine. Allow the marshmallow to set. This should take about an hour. (While you wait, you can finish the graham crackers.)
When the marshmallow mixture has set, sift the confectioners' sugar into a shallow dish or bowl. Run a wet knife (or oiled spatula) around the edge of the cooled pan to loosen the marshmallow sheet. Remove the marshmallows from the pan -- this may take a little coaxing, but the sheet should be pretty sturdy once it's set, so don't worry. Cut into squares, using a sharp knife. It helps to wet the knife often to keep it from sticking. Toss each marshmallow in the confectioners' sugar until completely coated.
Store the marshmallows in a single layer (or between sheets of waxed paper) in an airtight container. It should last for up to 1 month.
No comments:
Post a Comment